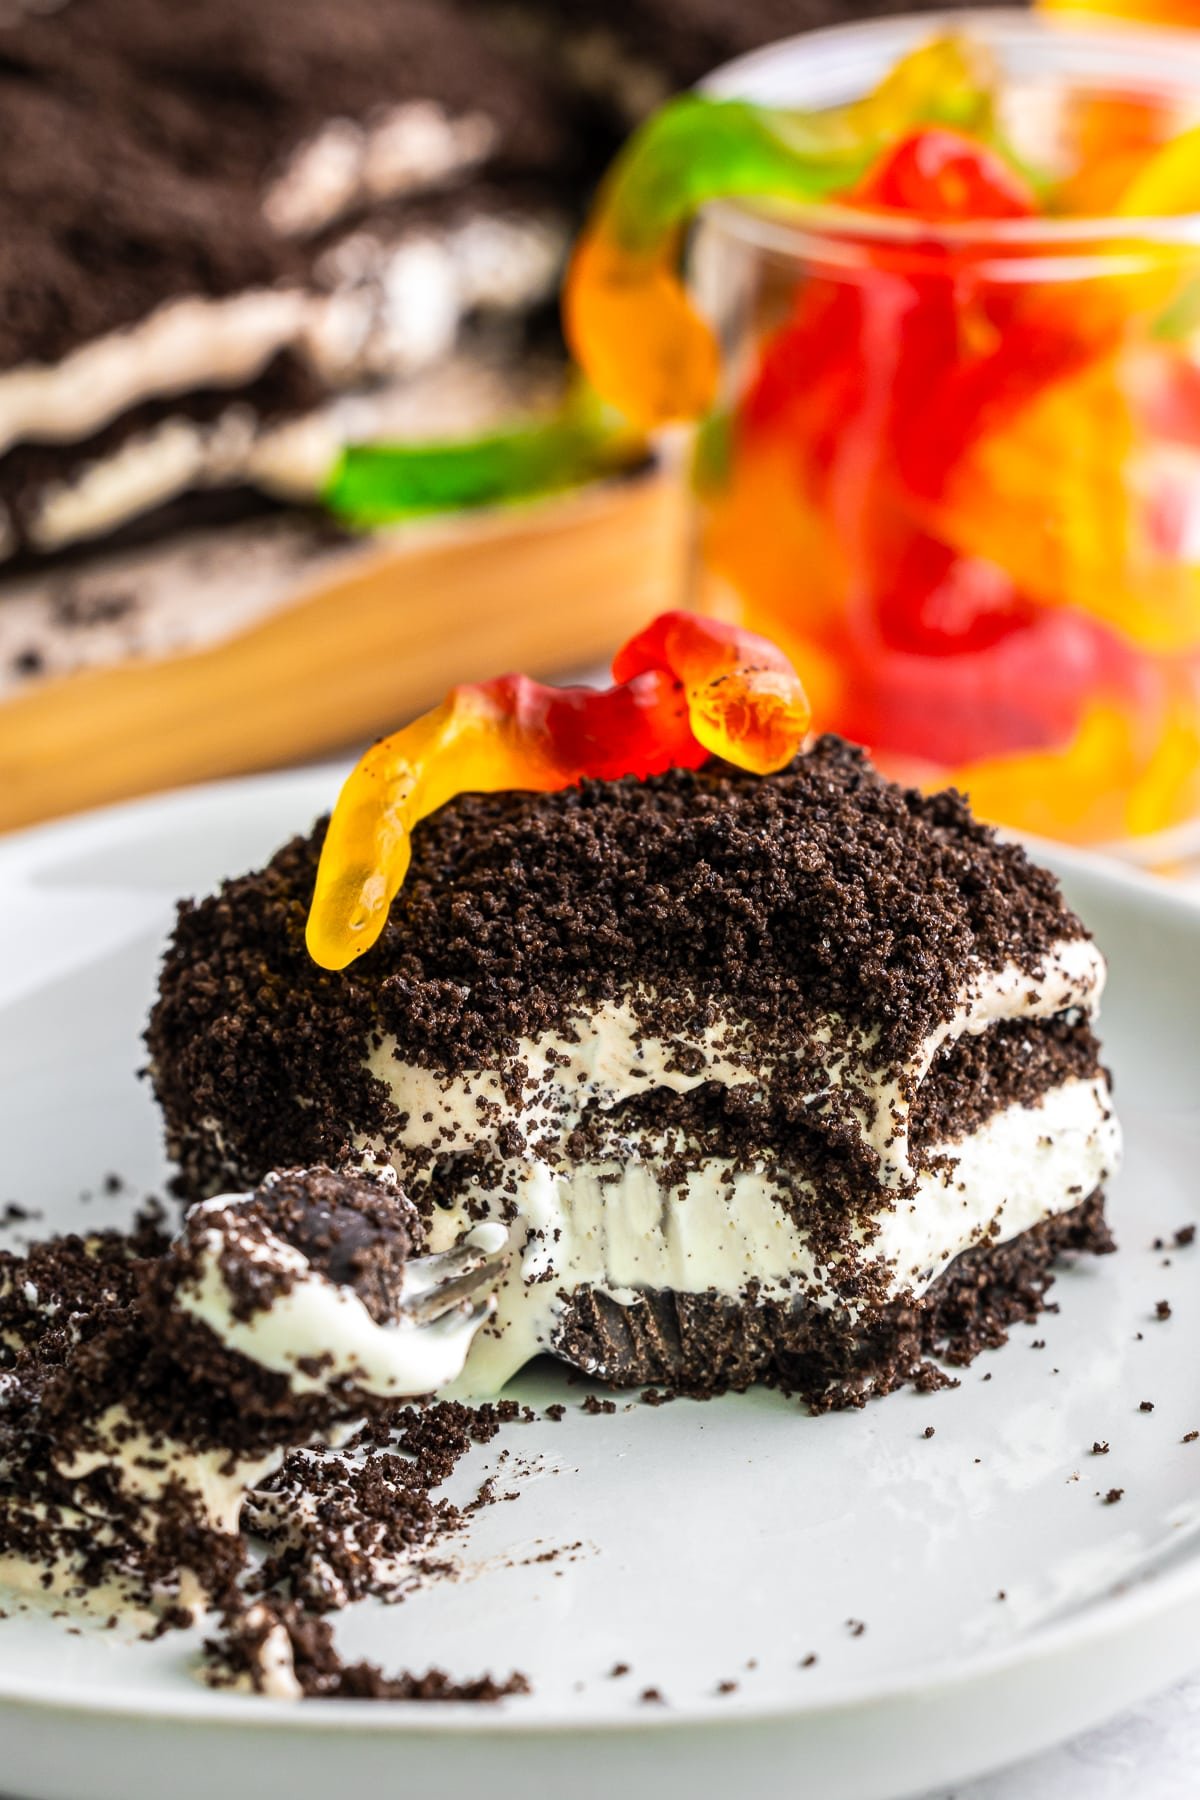
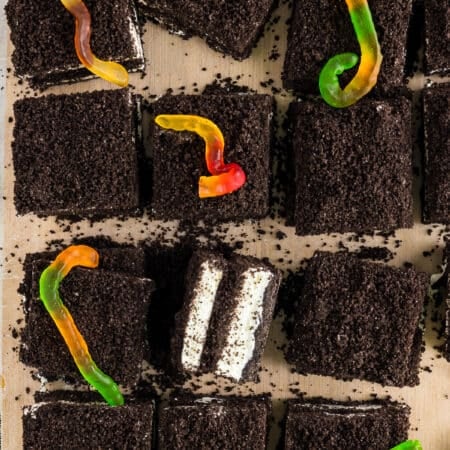
A delicious Dirt Cake Recipe, but make it frozen?! Layers of crushed Oreos between a creamy filling, all topped with gummi worms, the ultimate fun treat.

This Dirt Cake Recipe (frozen version) takes the beloved classic to new, chilly heights, combining the crunchy goodness of Oreo cookies with the smoothness of a sweet cream cheese mixture, all topped off with playful gummi worms.
This Oreo dirt cake recipe is the perfect treat for birthday parties, special occasions, or just a yummy dessert at home.
This is the kind of thing my daughter asks for on her birthday. She looooves ice cream cake and this Oreo dirt dessert is right up her alley.
What makes this recipe so special? It’s that Oreo cookie crust and the cream cheese filling! Not only is it packed with flavor, it’s also super easy to put together.
Plus, it’s a great way to get the whole family involved in the kitchen. From crushing Oreos with a rolling pin or food processor to layering the ingredients, kids and adults love it.
And hey, if you have any remaining crushed Oreos, you could make some Oreo dirt pudding while you’re at it. Oreo lovers unite, haha!
Let’s get into how you can whip up this irresistible Dirt Cake Recipe!
Some of our other favorite Oreo dessert recipes we have on our site include: Edible Chocolate Cookie Dough with Oreos, Best Fluffy Oreo Buttercream Frosting Recipe, and Easy Oreo Better Than Sex Cake Recipe.

WHY THIS RECIPE WORKS:
- No Oven Required: This easy dirt cake recipe frees you from baking, making it perfect for any season.
- Kid-Friendly Fun: Crushing Oreos, layering the dessert, and adding gummy worms is a blast for kids.
- Deliciously Layered: The combination of Oreo crumbs, creamy filling, and gummy worms is unbeatable.
INGREDIENTS NEEDED (SCROLL TO THE BOTTOM OF THIS POST FOR THE FULL RECIPE CARD):
- Family-sized Oreos
- Cream cheese (softened)
- Sweetened condensed milk
- Whipped topping, like Cool Whip
- Unsalted butter (melted)
- Vanilla extract or paste
- Cocoa powder
- Gummi worms

HOW TO MAKE DIRT CAKE RECIPE:
- Take the Oreos, place them in a food processor, and turn them into crumbs. You may have to do this in batches.
- Add half of the crumbs to a medium bowl and mix with the melted butter.
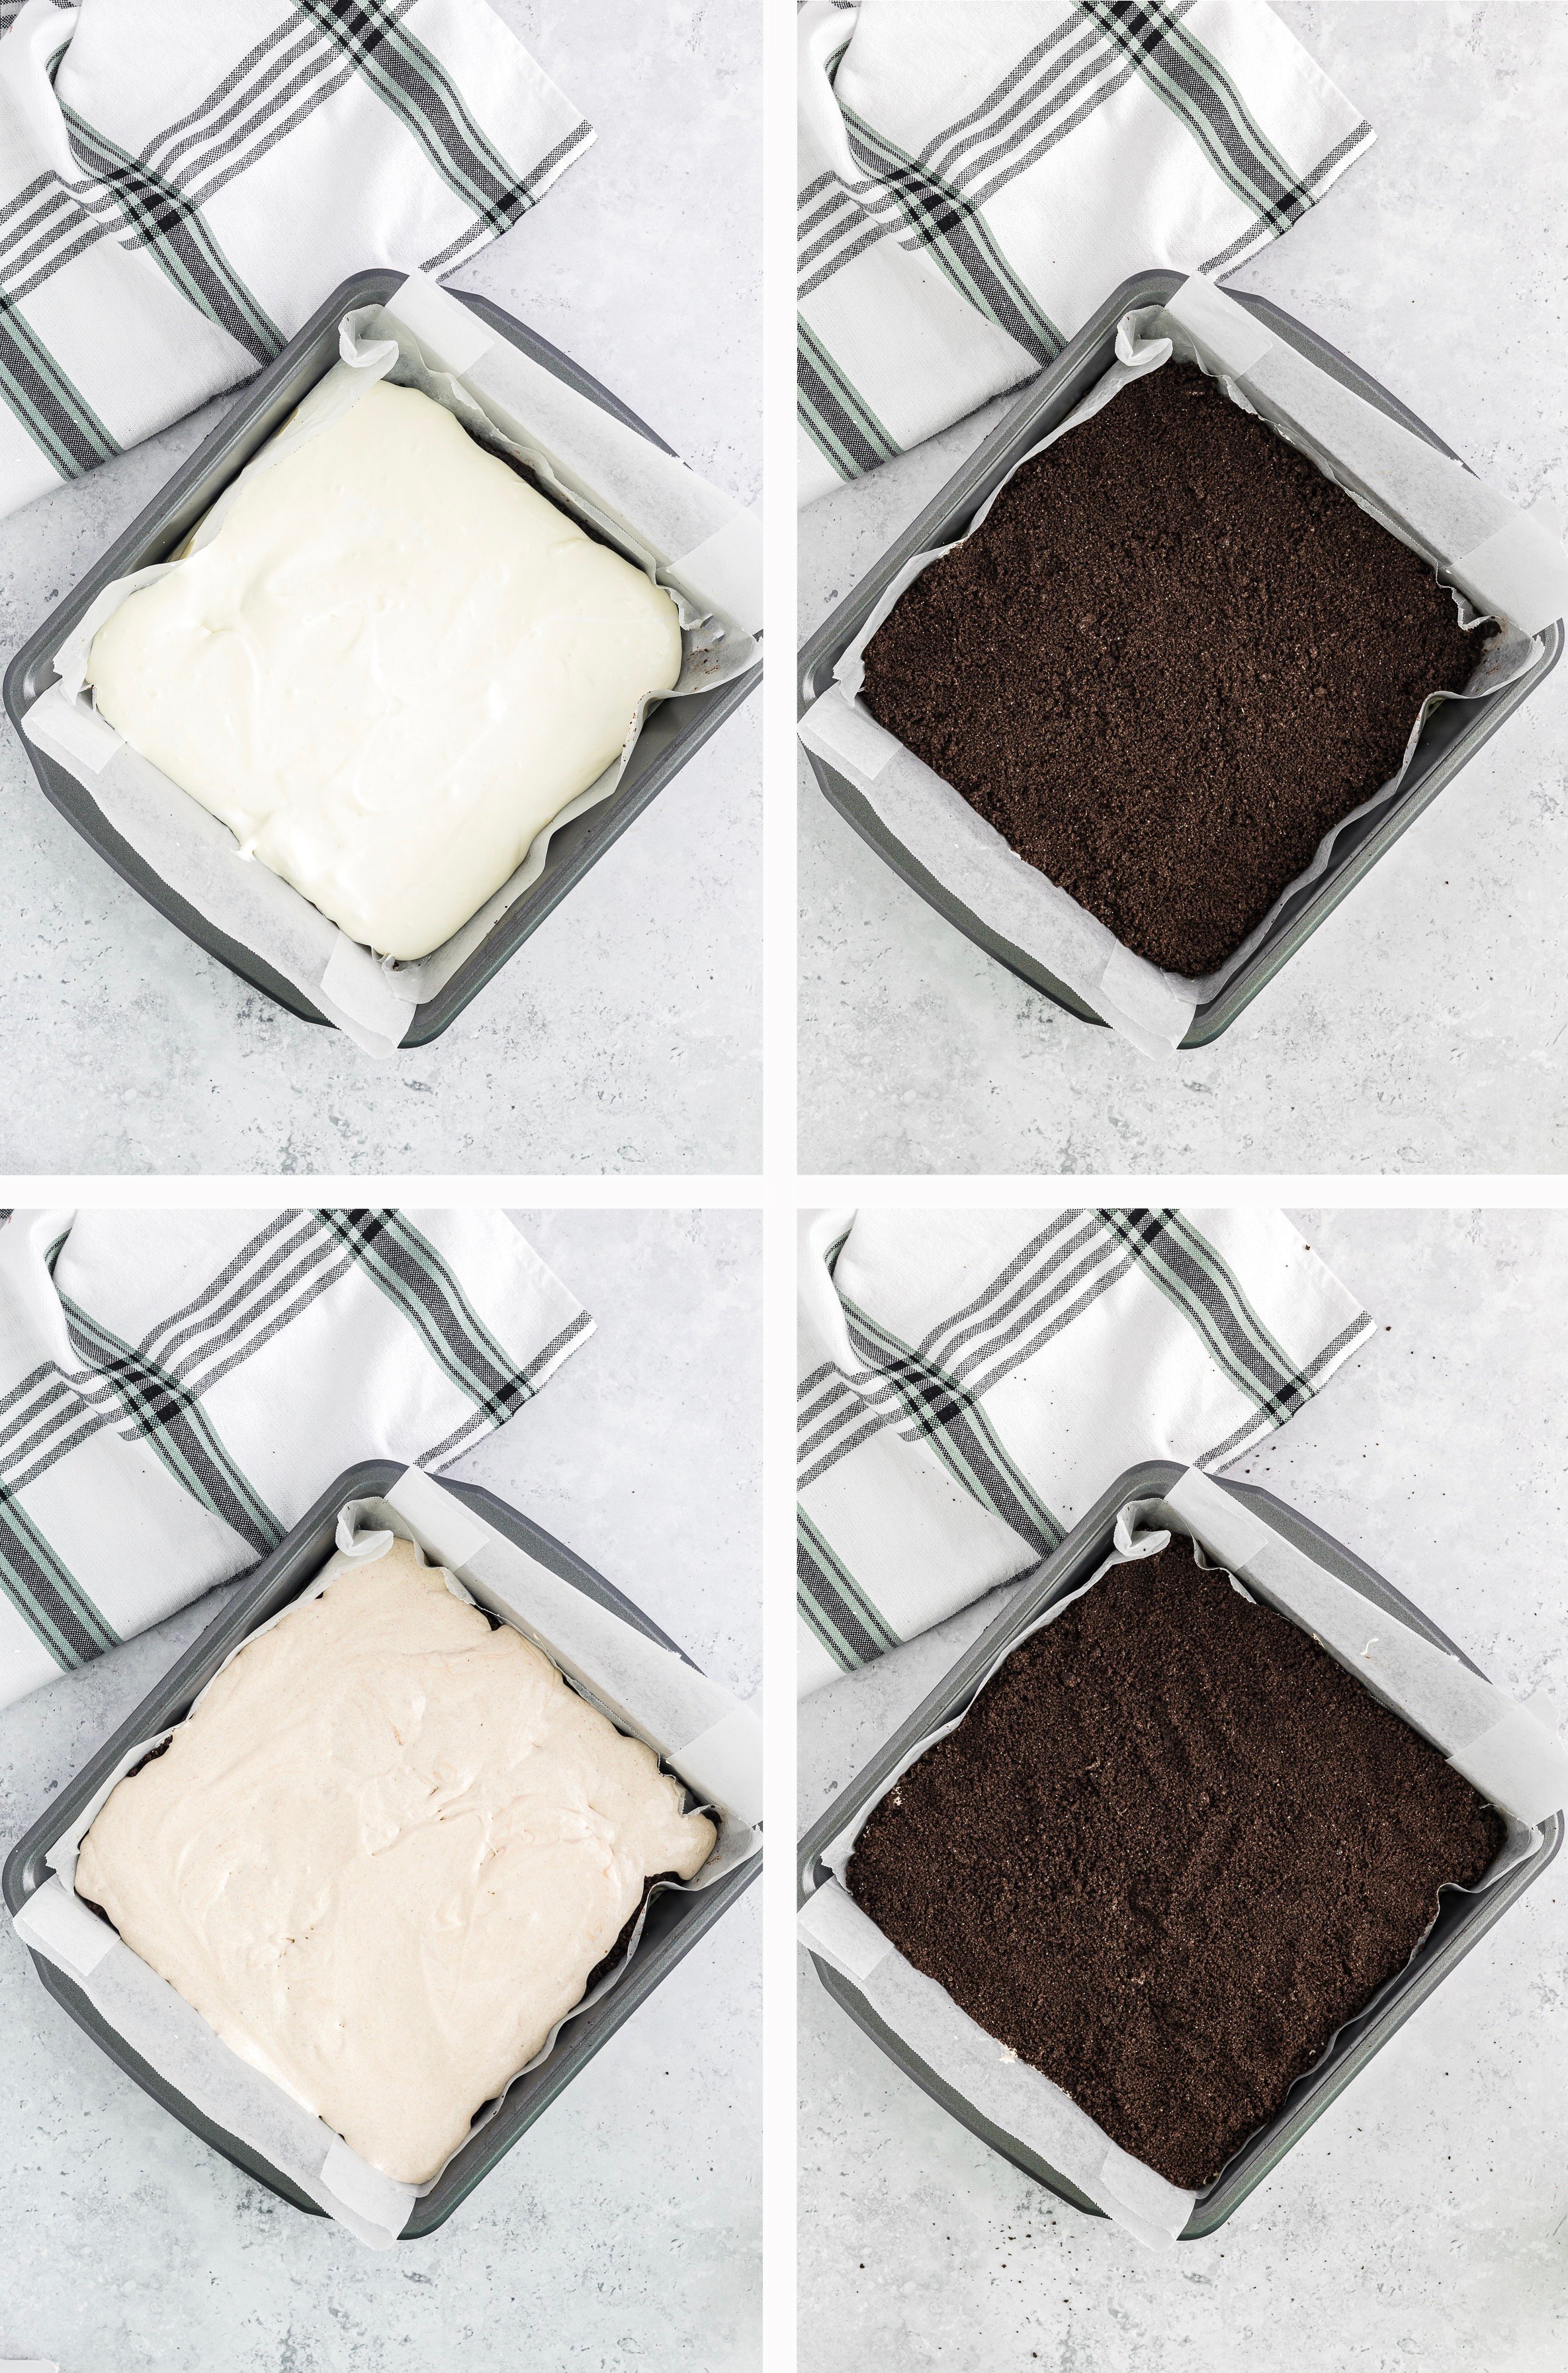
- Line a 9×9-inch baking pan with parchment or wax paper, and press the crumbs into the bottom of the pan to form a crust. Place in the freezer while you prepare the next step.

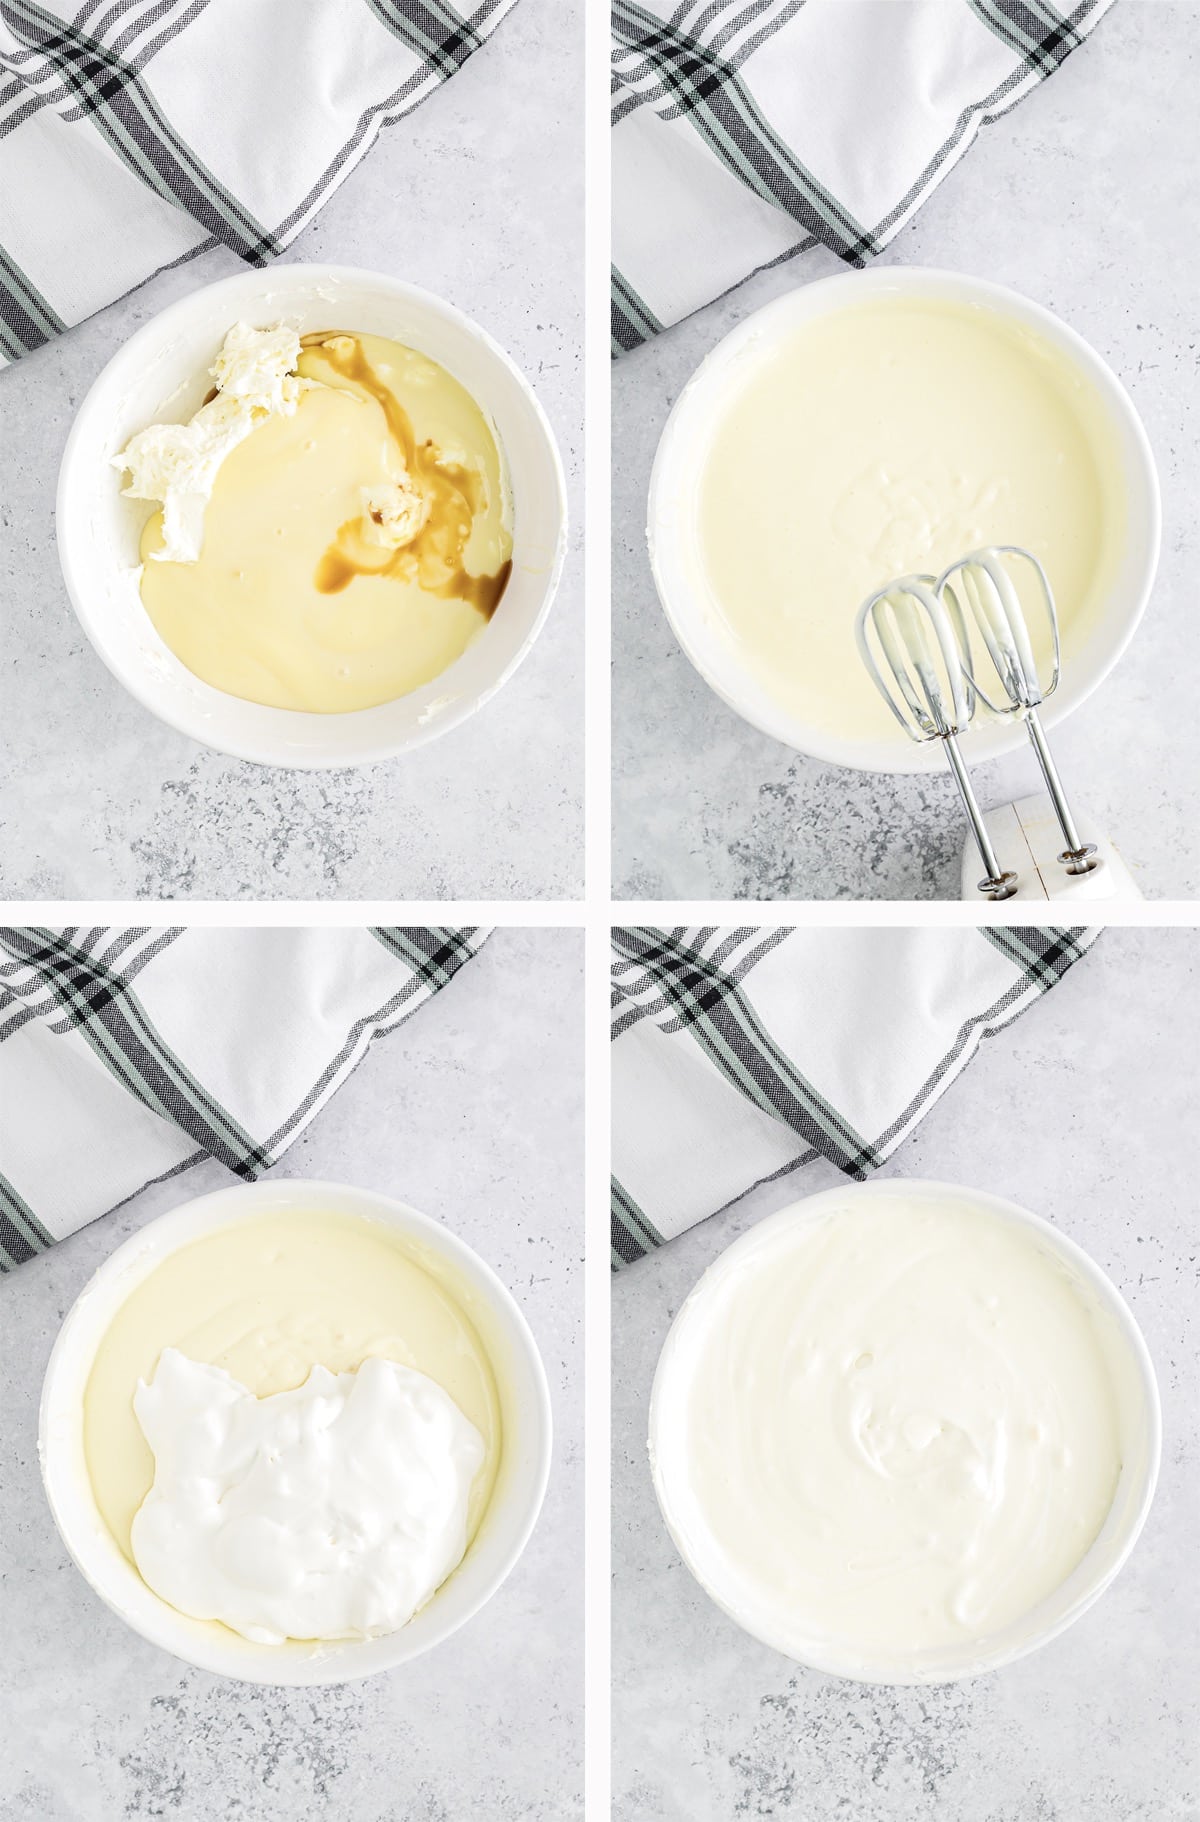
- Place the cream cheese into a large bowl and cream on high with a hand mixer for about a minute until smooth.
- Add the sweetened condensed milk and vanilla and mix until combined.
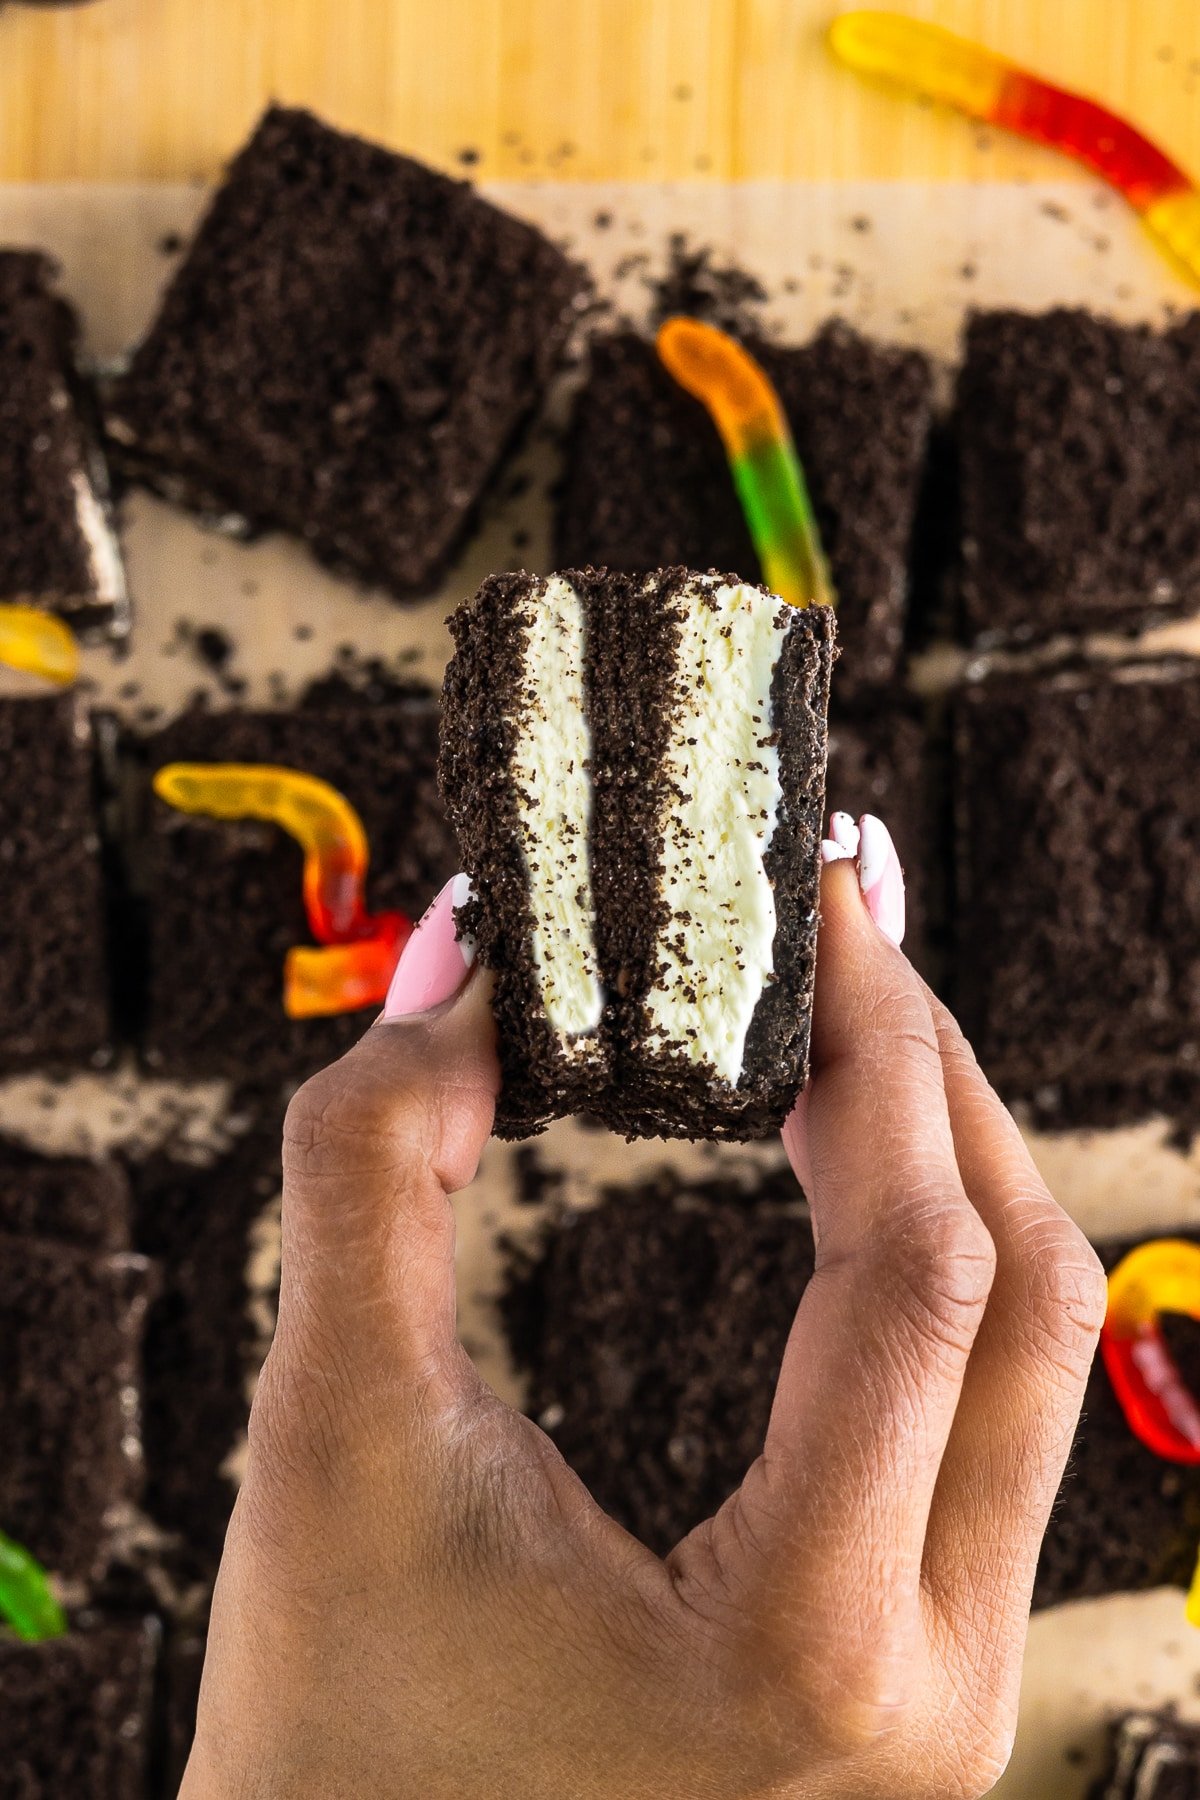
- Fold in the whipped topping until there are no streaks left.
- Pour half of the cream cheese mixture over the Oreo crust and smooth it out.
- Take about 1/3 of the remaining Oreo cookie crumbs and sprinkle this evenly over the vanilla mixture.
- With the remaining cream cheese mixture, add the cocoa powder and mix to combine.
- Pour this over the cookie crumbs and spread out as evenly as possible.
- Top with the remaining cookie crumbs. Place in the freezer for at least 4 hours or until completely set.
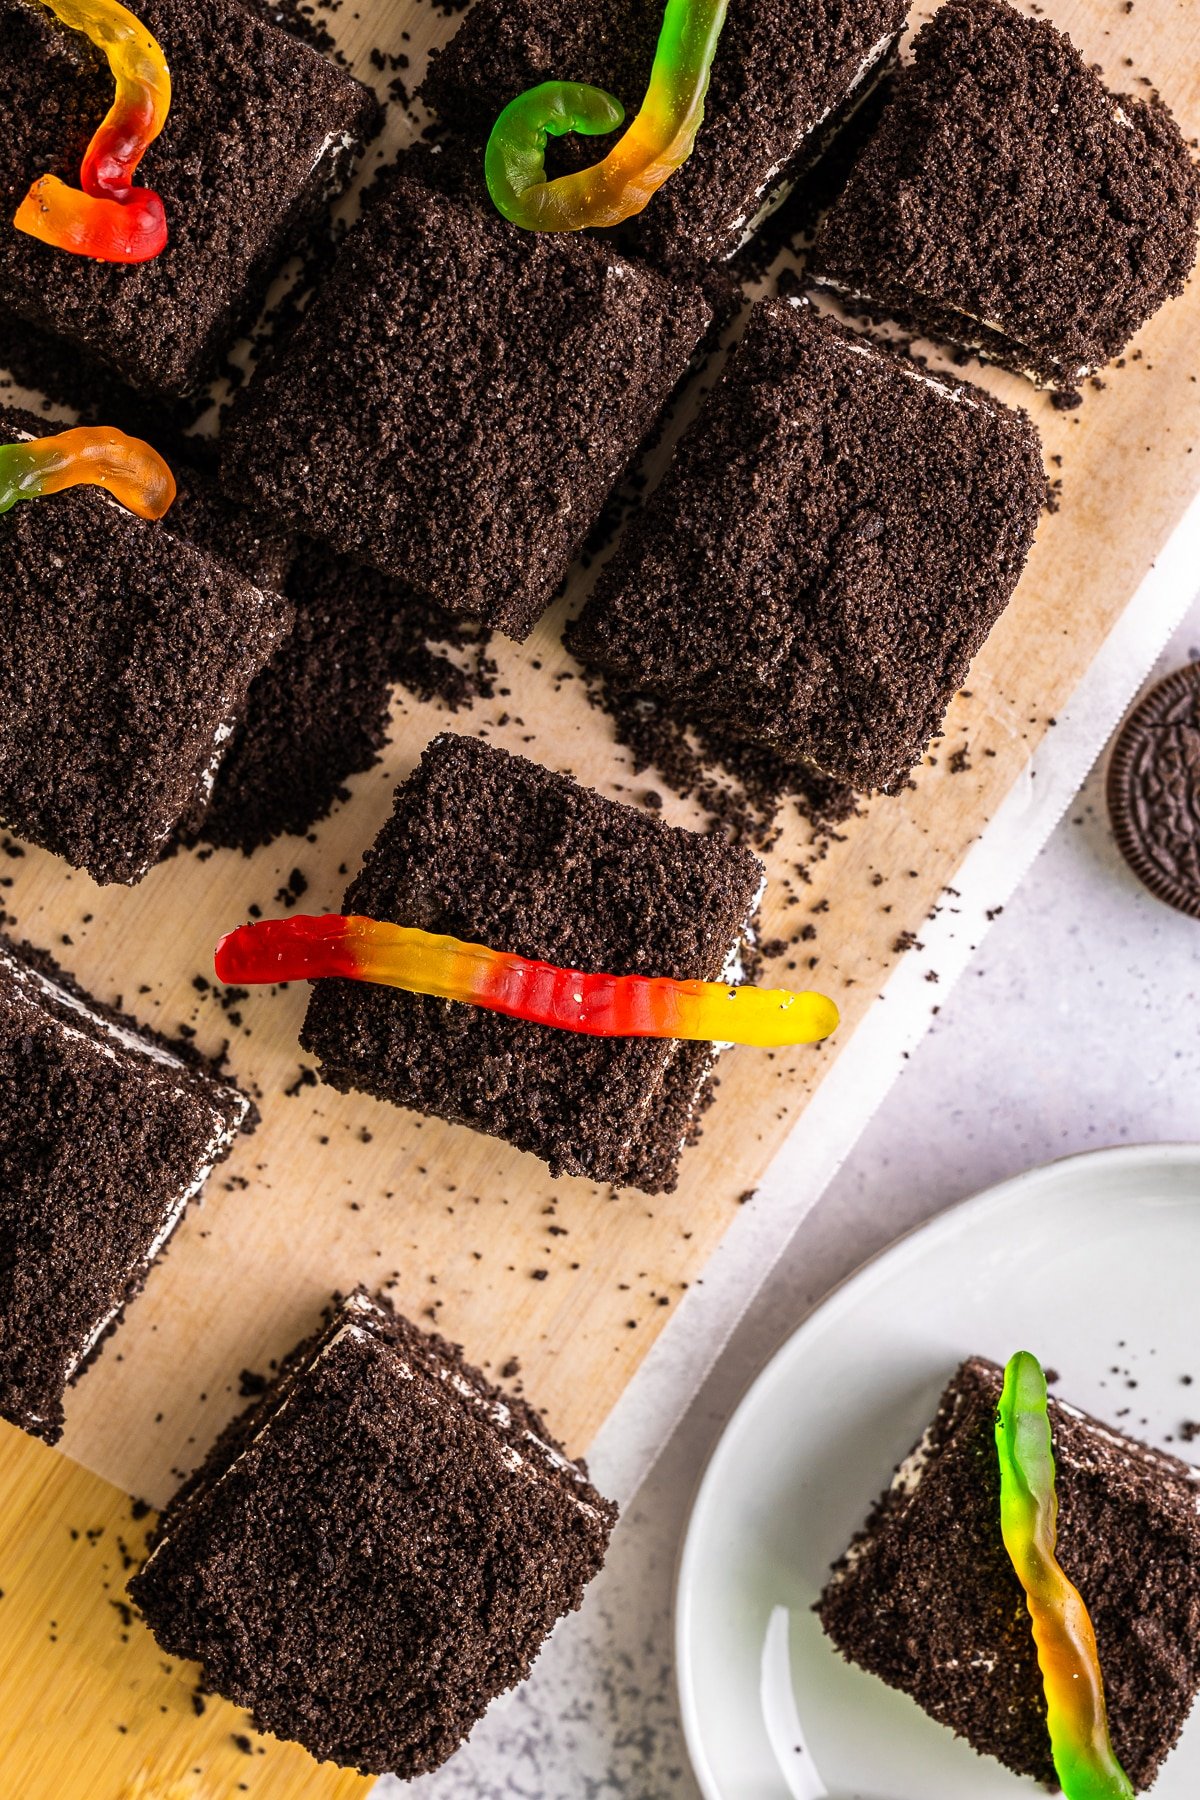
- To serve, top with gummi worms and cut into bars.
FREQUENTLY ASKED QUESTIONS ABOUT THIS RECIPE:
CAN THIS BE MADE AHEAD?
Yes, it’s the perfect make-ahead dessert recipe for any gathering.
Since it’s going in the freezer you really don’t have to worry about it going bad.
Just another reason that it’s one of the best dessert recipes out there!
CAN I USE A DIFFERENT COOKIE?
Sure, feel free to try different flavors of Oreos or even sandwich cookies to find your favorite combination.
Golden Oreos would be a great choice.
I’m also thinking Keebler fudge cookies might be a good fit!

ANY ADDITIONS?
You better believe it! This list should about cover it.
- Mix in peanut butter cups with the Oreo layer for a peanut butter twist.
- Incorporate instant vanilla pudding mix into the cream cheese layer for extra creaminess.
- Layer in some homemade chocolate chip cookie dough for a cookie surprise.
- Use instant chocolate pudding for a deeper chocolate flavor.
- Include whipped cream on top for a light, airy finish.
- Toss in white chocolate pudding to the cream cheese mixture for a vanilla chocolate mix.
- Stir in crushed candy bars for a crunchy texture.
- Drizzle caramel sauce over the top before serving for a gooey addition.
ANY SUBSTITUTIONS?
Let me know in the comments if there are any other options you’d like to see here!
- Replace the family-sized bag of Oreos with gluten-free Oreos for those with dietary restrictions.
- Choose dairy-free cream cheese and whipped topping to make this dessert vegan-friendly.
HOW TO STORE:
Freezer: Since this is a frozen treat, it needs to be kept in the freezer in an airtight container.
Wrap well and freeze for up to 3 months.
DANA’S TIPS AND TRICKS:
- A food processor makes quick work of turning Oreos into fine crumbs.
- Letting the cream cheese reach room temperature makes for a smoother, creamier filling.
- Press the Oreo crust firmly into your pan to ensure it holds together.
- Freezing the bars until set makes slicing into perfect squares easier.
- Garnishing with gummy worms right before serving keeps them soft and chewy.
- Experimenting with different layers and flavors keeps this recipe exciting each time you make it.
Our Dirt Cake recipe is a yummy frozen treat that’s sure to bring smiles to everyone who tries it.
They’re the perfect combination of easy, delicious, and fun, making them ideal for any occasion.
Whether you’re making them for a family dessert, a special celebration, or just because, these bars are guaranteed to be a hit.
If you like this recipe, you might also like:
If you’ve tried this DIRT CAKE RECIPE, let me know how it turned out in the comments! You can follow me over on PINTEREST, INSTAGRAM OR FACEBOOK to find some more of our mouthwatering recipes!
Easy No Bake Frozen Dirt Cake Recipe
Ingredients
- 19.1 ounce package family-sized Oreos
- 6 tablespoons unsalted butter melted
- 8 ounces cream cheese softened
- 14 ounces sweetened condensed milk
- 1 teaspoon vanilla extract
- 8 ounces whipped topping
- 1 teaspoon cocoa powder
- gummi worms for garnish
Instructions
- Take the Oreos, place them in a food processor, and turn them into crumbs. You may have to do this in batches.19.1 ounce package family-sized Oreos
- Add half of the crumbs to a medium bowl and mix with the melted butter.6 tablespoons unsalted butter
- Line a 9×9-inch baking pan with parchment or wax paper, and press the crumbs into the bottom of the pan to form a crust. Place in the freezer while you prepare the next step.
- Place the cream cheese into a large bowl and cream on high with a hand mixer for about a minute until smooth.8 ounces cream cheese
- Add the sweetened condensed milk and vanilla and mix until combined.14 ounces sweetened condensed milk, 1 teaspoon vanilla extract
- Fold in the whipped topping until there are no streaks left.8 ounces whipped topping
- Pour half of the cream cheese mixture over the Oreo crust and smooth it out.
- Take about 1/3 of the remaining Oreo cookie crumbs and sprinkle this evenly over the vanilla mixture.
- With the remaining cream cheese mixture, add the cocoa powder and mix to combine.1 teaspoon cocoa powder
- Pour this over the cookie crumbs and spread out as evenly as possible.
- Top with the remaining cookie crumbs. Place in the freezer for at least 4 hours or until completely set.
- To serve, top with gummi worms and cut into bars.gummi worms for garnish
Notes
- A food processor makes quick work of turning Oreos into fine crumbs.
- Letting the cream cheese reach room temperature makes for a smoother, creamier filling.
- Press the Oreo crust firmly into your pan to ensure it holds together.
- Freezing the bars until set makes slicing into perfect squares easier.
- Garnishing with gummy worms right before serving keeps them soft and chewy.
- Experimenting with different layers and flavors keeps this recipe exciting each time you make it.


Comments & Reviews
Lauren says
These look adorable! Not only cute, cute, cute but yummy too! I can’t wait to try them!!
*Happy to visit from SITS*
Jessica J says
Visiting from the SITS linky 🙂 Love your recipe. It caught my eye right away. I have a 5 year old that would love these, especially the gummy worms.
Blair @ The Seasoned Mom says
This is such a fun twist on the classic dirt cake, Dana! My boys would love it. 🙂 Pinned!
Amy | Club Narwhal says
I love dirt cake too (talk about a blast from the past) and your twist on it is so fun! I know quite a few kids (and adults) who would adore this 🙂
Breanna says
These look unbelievable!! Must try 🙂
Thalia @ butter and brioche says
these are just super cute, the worms are such a great idea. my inner child totally loves these.
Elise @frugalfarmwife.com says
Oh my goodness, those look awesome! My entire family is in love with dirt cake – in fact, my thirty-something-year-old brother still have dirt cake for his birthday every year!
What a terrific modification. It looks so much more appetizing as bars! 🙂
Jennifer Johnson says
As usual yummy and cute!
Shaina says
Stopping by from the Super Saturday Link Party and sure glad I did because…YUM! I LOVED making “dirt” pudding as a kid. This frozen version is a great idea!
Jessica says
mmmm…frozen cake topped with gummy worms is a sure winner for me! I love oreos, cream cheese, and anything gummy. I could probably live off of tho cake!
Thanks for sharing and linking up at the Saturday Snickerdoodle Link up PARTY!
Jessica
The Happy Creations says
Looks delicious.I’m going to try this!!
Jill says
They look so good – and what a great name for them!
Thanks for linking to a Round Tuit!
Hope you have a fabulous week!
Jill @ Creating my way to Success
http://www.jembellish.blogspot.com/
Mayje says
Hi! Dropping by from Craft O Maniac blog party! It looks so yummy and definitely a must try for me. Thanks for sharing!
Kristina and Millie says
These look like so much fun. My daughter LOVES dirt cake, she will be so excited when I pull these out of the freezer! Thanks for linking up to Snickerdoodle Sunday
Made From Pinterest says
Yum! I love anything involving Oreos! Can’t wait to try this!
Cathy Mini says
How fun! I believe I remember having something similar when I was younger–but not frozen! That is definitely an awesome spin on a traditional kid’s treat! Nice job!
Cheers,
~Cathy Mini~
OurMiniFamily.com
Rachel says
Made these and they were yummy but they didn’t freeze 🙁 they just stayed yogurt consistency so they were super messy
Dana DeVolk says
Strange, how long did you let them set up for? If you decide to make them again, I would leave them in the freezer longer. You could check them after 4 hours and if they seem not set, keep checking back every couple hours. I normally make items like this the day before. Sorry they didn’t come out just right, but I’m glad they still tasted yummy!
Holly says
This looks so good! I’m making it today for my husbands 25th birthday. He has a worm bin that he raises for fishing and gardening reasons and his favorite dessert is ice cream cake of any kind so this in my head is a perfect surprise lol. Thank you for sharing the recipe!!!